
Household Crafts
 No Brainer Curtains
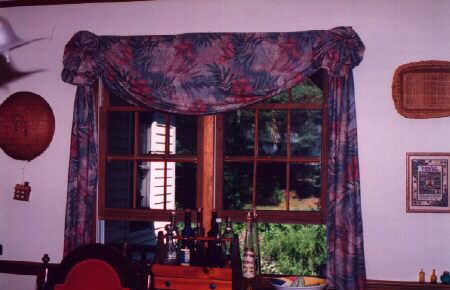 My home is decidedly "country" in look. However, this curtain idea will fit anywhere depending on how the curtains are hung and the theme, texture and nature of the fabric used. I recently fell in love with window scarves, but probably because I'd been using a similar idea for years.
The only sewing involved in this idea is to hem the four sides of a single rectangular piece of fabric. That's why I call them "no-brainers". You won't even need a curtain rod...just a couple of decorative screw-on type tie backs that stand out from the frame of the window. Or you could opt for a "draped" look and use a pretty curtain dowel with fancy finial ends. I've included a few sketches to illustrate my meaning. Feel free to snicker at them.
My home is decidedly "country" in look. However, this curtain idea will fit anywhere depending on how the curtains are hung and the theme, texture and nature of the fabric used. I recently fell in love with window scarves, but probably because I'd been using a similar idea for years.
The only sewing involved in this idea is to hem the four sides of a single rectangular piece of fabric. That's why I call them "no-brainers". You won't even need a curtain rod...just a couple of decorative screw-on type tie backs that stand out from the frame of the window. Or you could opt for a "draped" look and use a pretty curtain dowel with fancy finial ends. I've included a few sketches to illustrate my meaning. Feel free to snicker at them.
 1. Measure your window. Measure up one side, across the top and down the other side. For the sake of simplicitity, let's say the window is 60" on one side, 60 inches on the other side, and 30 inches across the top (I doubt there IS such a sized window, but the numbers are nice and even). We add them up and get 150 inches of total length. Divide 150 by 36 (one yard in inches) and we get the number in yards. That gives us 4 yards and 6 inches. If we want to add a fancy rosette at each corner we'll want another yard. Let's say we want the rosettes....that's 5 yards and 6 inches for one window.
(Tip: measure from where you want the curtain length to FALL and then add extra inches for hemming, fabric draping, streamers coming off the bows, and you'll be sure to have enough fabric. The WIDTH of the fabric is up to you. How much fullness and drape to you want? A thin fabric drapes well, a heavier fabric is more difficult to work with. Sheeting material works great in 36 to 44-inch widths.)
2. Because we want enough fabric to allow for hemming and for adjusting any crooked cuts we got at the store, we'll buy 5 and 1/2 yards (for a single window). This will probably give us a foot of extra fabric when we're done which we can put aside in our scrap bin and use for cute scrap projects like crazy quilting. OR you could use it to make some "ties" hanging off the rosettes.
1. Measure your window. Measure up one side, across the top and down the other side. For the sake of simplicitity, let's say the window is 60" on one side, 60 inches on the other side, and 30 inches across the top (I doubt there IS such a sized window, but the numbers are nice and even). We add them up and get 150 inches of total length. Divide 150 by 36 (one yard in inches) and we get the number in yards. That gives us 4 yards and 6 inches. If we want to add a fancy rosette at each corner we'll want another yard. Let's say we want the rosettes....that's 5 yards and 6 inches for one window.
(Tip: measure from where you want the curtain length to FALL and then add extra inches for hemming, fabric draping, streamers coming off the bows, and you'll be sure to have enough fabric. The WIDTH of the fabric is up to you. How much fullness and drape to you want? A thin fabric drapes well, a heavier fabric is more difficult to work with. Sheeting material works great in 36 to 44-inch widths.)
2. Because we want enough fabric to allow for hemming and for adjusting any crooked cuts we got at the store, we'll buy 5 and 1/2 yards (for a single window). This will probably give us a foot of extra fabric when we're done which we can put aside in our scrap bin and use for cute scrap projects like crazy quilting. OR you could use it to make some "ties" hanging off the rosettes.
 3a. Make sure the ends of the fabric are "squared" off so that they are nice and even and then hem all sides. If you purchased that extra yard for rosettes, then cut that off first and set aside while you finish the hemming on the panel. Drape your panel over the tie backs. When ready to do the rosettes, fold the 1-yard piece in half LENGTHWISE and cut right down the fold. You now have 2 long pieces, each 1 yard long, which you will hem on each side. You will fold this piece up and down, up and down like a worm (see illustration) and then put an elastic right around it's center (see dotted line in illustration). Then "puff" out the folds of the fabric and hang the rosette at each corner of the window using the elastic.
 That's all there is to making these curtains. You can find great bargains on fabrics in season and I've found wonderful muted prints in sheets on sale that were better than the ones at the fabric store. I've had to cut those so that it required 2 or 3 pieces to make a single panel, but if you put the seams at the corners of the window and then cover with a bow (use a solid contrasting color for something different!), they look fantastic. If you're not the "rosette" type and prefer to simply loop the curtains around tie backs, add an extra foot to the measurement of each panel to allow for the wrapping of the fabric around the tie back or rod.
Easy Pillow Covers
If you plan to purchase fabric for the living room windows, it's a good time to spruce up the old pillows on the couch with some new covers. I've never been fond of those small toss pillows. When I relax, I like something more substantial behind my back or under my head. I usually purchase standard sized bed pillows at the local discount store and cover them, but this pattern can be adapted to any shape pillow. These can be as simple or fancy as you like, but the basic cover is a simple "envelope" construction.
A cover for a standard pillow should measure 20"x26". You will need one yard of 45" wide fabric. From this you will cut one rectangle measuring 21" wide by 27" long for the front (allowing 1/2 all around for seams). And you will cut another two rectangles each measuring 21" wide by 18" long for the back (again allowing for 1/2" seams).
Make a narrow hem along one 21" width on each back section. Lay the front panel out with the right side facing you. Lay one back panel over the front panel placing the right sides 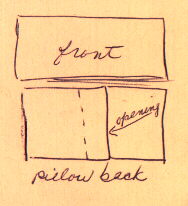 of the fabric together matching the UNhemmed bottom and sides. The hemmed edge of the back panel will fall about 2/3rds of the way up the front panel. Take the 2nd back panel and match the unhemmed edges to the edges of the other end of the front panel. You will notice that the back panels overlap each other. Pin it all together and sew the 4 sides. Open it and you have created a simple sandwich pillow cover.
Some nice ways of finishing this work are to use single fold bias tape around the outside edge (in this case you would have sewn it all together with the right sides of your fabric facing OUTward [wrong sides together] and then covered the seams with bias tape).
of the fabric together matching the UNhemmed bottom and sides. The hemmed edge of the back panel will fall about 2/3rds of the way up the front panel. Take the 2nd back panel and match the unhemmed edges to the edges of the other end of the front panel. You will notice that the back panels overlap each other. Pin it all together and sew the 4 sides. Open it and you have created a simple sandwich pillow cover.
Some nice ways of finishing this work are to use single fold bias tape around the outside edge (in this case you would have sewn it all together with the right sides of your fabric facing OUTward [wrong sides together] and then covered the seams with bias tape).
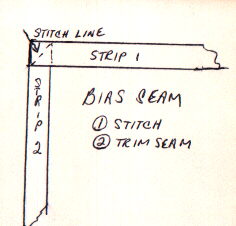 Tip: You can even create your own tape from another piece of your same fabric (buy extra for this) or a contrasting color fabric by cutting strips on the bias. Cut 2" strips on the bias and join together using a bias seam. To create a bias seam, place the ends of two strips with right sides together at a 90 degree angle to each other and sew from corner to corner. Trim seam and open. You're done when the strip is long enough to cover the outside edge of your pillow cover. Use your iron to press down a 3/8" fold along each long side edge and then fold the strip in half and press that down. You now have a long strip of your own bias tape. It's a bit of knowledge that comes in handy for many sewing projects. Sewing the strips together on the bias to create a longer strip, reduces the bulk of any seams.
Other ways to decorate are to add ruffles or lace along the seams. These would be basted to the front (facing inwards towards the center of the pillow) and then the 2 back panels would be pinned to the front in the usual manner. This sandwiches the lace between the layers in the proper position. When the cover is opened, the ruffle or lace edging would be in place and sewn into the seam.
These covers and inexpensive or old pillows you're willing to part with make great pet beds. We got tired of fighting the pets for our sofa pillows when all they really wanted was a soft place to lay their heads too. So using cheap polyester-filled, standard-sized pillows for the smaller ones and a larger pillow for the large dog, I created covers for them and they now all have their very own pillows/beds. The covers are tossed into the wash often, but the pillows themselves can be washed and dried regularly too, making these ideal pet beds. Make sure to buy polyester type filled pillows and not foam or feathers for this (feathers can be dried that way, but it's a pain to do and would trap too many "germs" and bugs with animals sleeping on them and, being a fire hazard, foam can't be placed in a dryer). You'll want to put them in the dryer with a couple of sneakers or tennis balls to keep them fluffed during the drying process.
Tip: You can even create your own tape from another piece of your same fabric (buy extra for this) or a contrasting color fabric by cutting strips on the bias. Cut 2" strips on the bias and join together using a bias seam. To create a bias seam, place the ends of two strips with right sides together at a 90 degree angle to each other and sew from corner to corner. Trim seam and open. You're done when the strip is long enough to cover the outside edge of your pillow cover. Use your iron to press down a 3/8" fold along each long side edge and then fold the strip in half and press that down. You now have a long strip of your own bias tape. It's a bit of knowledge that comes in handy for many sewing projects. Sewing the strips together on the bias to create a longer strip, reduces the bulk of any seams.
Other ways to decorate are to add ruffles or lace along the seams. These would be basted to the front (facing inwards towards the center of the pillow) and then the 2 back panels would be pinned to the front in the usual manner. This sandwiches the lace between the layers in the proper position. When the cover is opened, the ruffle or lace edging would be in place and sewn into the seam.
These covers and inexpensive or old pillows you're willing to part with make great pet beds. We got tired of fighting the pets for our sofa pillows when all they really wanted was a soft place to lay their heads too. So using cheap polyester-filled, standard-sized pillows for the smaller ones and a larger pillow for the large dog, I created covers for them and they now all have their very own pillows/beds. The covers are tossed into the wash often, but the pillows themselves can be washed and dried regularly too, making these ideal pet beds. Make sure to buy polyester type filled pillows and not foam or feathers for this (feathers can be dried that way, but it's a pain to do and would trap too many "germs" and bugs with animals sleeping on them and, being a fire hazard, foam can't be placed in a dryer). You'll want to put them in the dryer with a couple of sneakers or tennis balls to keep them fluffed during the drying process.
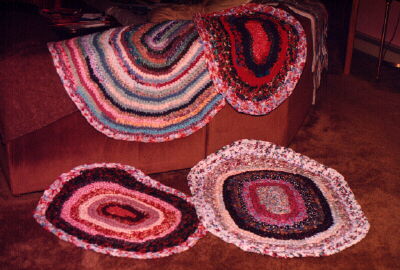
Crocheted Rag Rugs
Some basic crochet knowledge is needed for this one. Round up all the cotton and cotton/poly fabrics you have. Old sheets, old clothes, fabric scraps from the sewing room. If you don't have enough, check yard sales, thrift shops, goodwill shops and ask your relatives...they'll probably be thrilled to get rid of their "rags".
 The idea is to cut the fabric into strips and then sew the ends together to create balls of "yarn". Begin by cutting one fabric into 2" wide strips. I strongly recommend cutting as opposed to ripping, since ripping the fabric creates a lot of fine lint dust that can bother breathing and be downright nasty to vacuum up. Unless of course you can do this outside, but also consider that ripped pieces aren't uniform, tending to "pull" in various spots. For the sake of the finished product, cut rather than rip.
When the first fabric is cut into strips, use one of the strips (or a scrap end) to tie them together in a bundle. Put them aside and proceed the same way for each fabric. When all the fabric has been reduced to strips, take one bundle, open it and begin to sew the ends of each strip together to form a long continuous strip. The strips are joined by placing them, right sides facing, at a 90 degree angle to each other (see illus above for bias seam) and then they are sewn from corner to corner. Open it out and trim the excess fabric leaving a 1/4" seam. This method reduces any bulk and creates a smooth single piece. When the first bundle is done, place it aside and work on the next bundle.
When all the bundles have been turned into long "strands of yarn", begin to roll them individually into balls. Fold the outside edges toward the center and then fold the strip in the center (like single fold bias tape). This is done at the same time you're rolling it into a ball. By rolling it into a ball, you effectively press the fabric into place by the time you get ready to actually crochet with it. Do this for each individual bundle. When you have all your balls of fabric ready, you can begin to crochet.
You will need a size J or K metal afghan hook. I've found that this is the easiest tool to crochet this project with due to the length of the handle. It allows a good firm grip and makes it easier to pull the fabric through the loops. You will also need a needle, thread and a pair of scissors. As you're working, when one ball of "yarn" is finished, join the next color by placing the ends together at a 90 degree angle as before and hand-stitching from corner to corner. Trim seam and your ready to begin with the next color.
Begin by making a chain for the foundation. For large rugs (36x24-inches and larger) begin with a 10 to 12 inch chain. For small to medium sized rugs (18" to 24" long), begin with a 6 to 8-inch chain. (Leave about a 10-inch tail of fabric and as you work, crochet over this so it's hidden). The entire rug is worked in single crochet (sc).
Skip one chain and make 3 sc in next st (one end started). Working in one loop only of foundation chain, make 1 sc in each st down one side; make 3 sc in other end and work 1 sc in each st back to the 1st sc. Rounds are not joined and it's not necessary to mark them either.
On Rnd 2, make 2 sc in each of the 3 end sc's of previous rnd on each end and 1 sc in each sc along the sides. It's safe to say you can make 2 sc in each end sc on rnds 3 and 4, but after that you have to "feel" your way along for the increases. Each fabric responds differently and the only thing to deal with is to make enough increases (evenly spaced) at each end to keep the rug lying flat and not too many so that the rug doesn't sit flat enough. As the rug increases in size try to keep from making increases directly over those of the previous row...stagger them a bit. On the final round, try to make it around without any increases...more often than not this works and makes a nice finished edge. When the rug is at the size you desire, finish off by slip stitching in the next stitch (you can do 2 of these if you like over the next 2 sts). Then use your hook to pull the tail end through some of the stitches on the back of the rug. I like to make sure about 8" of tail is securely entwined this way. Then I use a needle and thread to tack down the very last bit.
These rugs will last many years and can be machine washed. Because of their weight when wet, I suggest putting them outside to dry. I'm just now replacing rugs I made 10 years ago and only because a puppy thought they were just the thing to chew on when we were gone. I found that protest of our absence a bit much, but luckily he grew out of that phase before I lost patience. Otherwise...those rugs would still be in use.
The idea is to cut the fabric into strips and then sew the ends together to create balls of "yarn". Begin by cutting one fabric into 2" wide strips. I strongly recommend cutting as opposed to ripping, since ripping the fabric creates a lot of fine lint dust that can bother breathing and be downright nasty to vacuum up. Unless of course you can do this outside, but also consider that ripped pieces aren't uniform, tending to "pull" in various spots. For the sake of the finished product, cut rather than rip.
When the first fabric is cut into strips, use one of the strips (or a scrap end) to tie them together in a bundle. Put them aside and proceed the same way for each fabric. When all the fabric has been reduced to strips, take one bundle, open it and begin to sew the ends of each strip together to form a long continuous strip. The strips are joined by placing them, right sides facing, at a 90 degree angle to each other (see illus above for bias seam) and then they are sewn from corner to corner. Open it out and trim the excess fabric leaving a 1/4" seam. This method reduces any bulk and creates a smooth single piece. When the first bundle is done, place it aside and work on the next bundle.
When all the bundles have been turned into long "strands of yarn", begin to roll them individually into balls. Fold the outside edges toward the center and then fold the strip in the center (like single fold bias tape). This is done at the same time you're rolling it into a ball. By rolling it into a ball, you effectively press the fabric into place by the time you get ready to actually crochet with it. Do this for each individual bundle. When you have all your balls of fabric ready, you can begin to crochet.
You will need a size J or K metal afghan hook. I've found that this is the easiest tool to crochet this project with due to the length of the handle. It allows a good firm grip and makes it easier to pull the fabric through the loops. You will also need a needle, thread and a pair of scissors. As you're working, when one ball of "yarn" is finished, join the next color by placing the ends together at a 90 degree angle as before and hand-stitching from corner to corner. Trim seam and your ready to begin with the next color.
Begin by making a chain for the foundation. For large rugs (36x24-inches and larger) begin with a 10 to 12 inch chain. For small to medium sized rugs (18" to 24" long), begin with a 6 to 8-inch chain. (Leave about a 10-inch tail of fabric and as you work, crochet over this so it's hidden). The entire rug is worked in single crochet (sc).
Skip one chain and make 3 sc in next st (one end started). Working in one loop only of foundation chain, make 1 sc in each st down one side; make 3 sc in other end and work 1 sc in each st back to the 1st sc. Rounds are not joined and it's not necessary to mark them either.
On Rnd 2, make 2 sc in each of the 3 end sc's of previous rnd on each end and 1 sc in each sc along the sides. It's safe to say you can make 2 sc in each end sc on rnds 3 and 4, but after that you have to "feel" your way along for the increases. Each fabric responds differently and the only thing to deal with is to make enough increases (evenly spaced) at each end to keep the rug lying flat and not too many so that the rug doesn't sit flat enough. As the rug increases in size try to keep from making increases directly over those of the previous row...stagger them a bit. On the final round, try to make it around without any increases...more often than not this works and makes a nice finished edge. When the rug is at the size you desire, finish off by slip stitching in the next stitch (you can do 2 of these if you like over the next 2 sts). Then use your hook to pull the tail end through some of the stitches on the back of the rug. I like to make sure about 8" of tail is securely entwined this way. Then I use a needle and thread to tack down the very last bit.
These rugs will last many years and can be machine washed. Because of their weight when wet, I suggest putting them outside to dry. I'm just now replacing rugs I made 10 years ago and only because a puppy thought they were just the thing to chew on when we were gone. I found that protest of our absence a bit much, but luckily he grew out of that phase before I lost patience. Otherwise...those rugs would still be in use.
Hot Pads
The photo on this page shows these pads after several years of use. They hold up beautifully. You will need Lily "Sugar n Cream" sport weight cotton yarn. I'm not sure 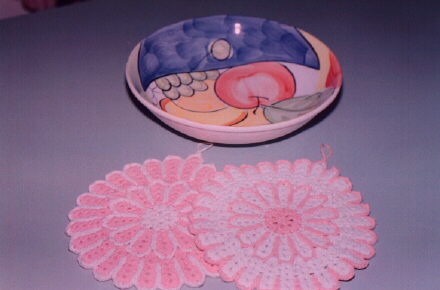 how much. I usually buy it on a one pound cone. Figure on 4 of the regular sized skeins of each color and you'll get several pads from it if you reverse the colors on the 2nd hot pad.
Note: You can also use 2 strands of bedspread cotton held together, but the product isn't quite as nice.
You will also need a size "D" crochet hook. If you think the stitches look too loose, use a smaller hook and if your work is too tight try a larger hook. Finished size is not a major factor on this one. The pattern consists of two pieces....a top and a bottom.
NOTE: (9 Feb 2006) Sorry to say the sport weight Sugar n Cream is no longer available. However, using an E or F hook with the 4-ply weight Sugar n Cream will net you a larger hot MAT which looks great on the table when serving warm dishes. It also functions in the kitchen equally well, but is a bit too large to hang up.
Top Section:
With contrasting color, ch 2 and make 6 sc in the 2nd ch from the hook. Join.
how much. I usually buy it on a one pound cone. Figure on 4 of the regular sized skeins of each color and you'll get several pads from it if you reverse the colors on the 2nd hot pad.
Note: You can also use 2 strands of bedspread cotton held together, but the product isn't quite as nice.
You will also need a size "D" crochet hook. If you think the stitches look too loose, use a smaller hook and if your work is too tight try a larger hook. Finished size is not a major factor on this one. The pattern consists of two pieces....a top and a bottom.
NOTE: (9 Feb 2006) Sorry to say the sport weight Sugar n Cream is no longer available. However, using an E or F hook with the 4-ply weight Sugar n Cream will net you a larger hot MAT which looks great on the table when serving warm dishes. It also functions in the kitchen equally well, but is a bit too large to hang up.
Top Section:
With contrasting color, ch 2 and make 6 sc in the 2nd ch from the hook. Join.
Rnd 2: *Ch 4, sl st in next sc; repeat from * 6 times (6 loops)
Rnd 3: Sl st into loop, ch3; then while keeping last loop of each st on hook, make 2 dc in same space, thread over and pull through all loops at one time (beginning cluster st made); ch 2 and cluster st in same space (cluster st= *thread over hook, insert in space, pull thread through and work off 2 loops then repeat in same space from * 2 times more; thread over hook and pull through all loops on hook at once); *ch 2, 2 cluster sts with ch 2 between in next loop; repeat from * around, ch 2 and join in top of beginning cluster st (12 cl st). Break off contrasting color.
Rnd 4: Attach Main Color in one of the loops and work 1 sc, ch 2, 1 sc in each loop; join in first sc.
Rnd 5: Sl st into loop, ch 3, dc in same space, ch 2, 2 dc in same space, *2 dc, ch 2, 2 dc (shell) in next loop, repeat from * all around join.
Rnd 6: Sl st to center of shell, ch 3, 1 dc, ch 2, 2 dc in same space, *2 dc, ch 2, 2 dc in center of next shell; repeat from * all around, join.
Rnd 7: Same as last row, but work 3 dc, ch 2, 3 dc in center of each shell. Join.
Rnd 8: Same as rnd 7. Join and then break off main color.
Rnd 9: Attach contrasting color in first dc of shell. (It gets a little tricky to read directions here, but if you look at the picture you'll see what's happening. A line of stitches is being made down and up between the rnds of shells and creates the outline). **Make 1 sc in each of the next 3 dc; make 2 sc, ch 3, 2 sc in center of shell; make 1 sc in each of the next 3 dc; then sc between the shells and ch 2; then sc over the previous row between the shells; then *ch 2, sc over next row below that and repeat from * twice; then ch 2 and work back upto the top in the same manner; then ch 2 and repeat from the ** all around. Join and break off the contrasting color.
Rnd 10: Attach Main Color in ch-3 loop in center of any shell; ch 3, 1 dc, ch 2, 2 dc in same place; *2 trc, ch 2, 2 trc in space between shells; 2 dc, ch 2, 2 dc in next ch 3 loop; repeat from * all around ending rnd with 2 trc, ch 2, 2 trc in space between shells. Join.
Rnds 11 and 12: Same as Rnd 6.
Rnds 13 and 14: Sl st to center of shell; ch 3, 2 dc, ch 2, 3 dc in same space; *3 dc, ch 2, 3 dc in center of next shell, repeat from * all around. Break off main color. Sew in your ends and put this piece aside.
Bottom Section: Work first 3 rnds same as top section and then break off contrasting color.
Rnd 4: Attach Main Color in loop, then ch 3, 2 dc in same space; *3 dc in next loop; repeat from * all around (36 dc). Join.
Rnd 5: Working in double crochet, increase in every 3rd dc around. (48 dc) Join.
Rnds 6 and 7: Working in double crochet, increase in every 4th dc around. Join.
Rnd 8: Increase in every 5th dc around. Join.
Rnd 9: Work even (no increases)
Rnd 10: Increase in every 15th dc. Join.
Rnd 11: Ch 3, 1 dc, ch 2, 2 dc in same space; *skip 3 dc and make 2 dc, ch 2, 2 dc in next dc; repeat from * all around. Join.
Rnds 12 and 13: Work a shell of 3 dc, ch 3, 3 dc in center of each shell. Join and break off Main Color.
Joining the two sections: Place the 2 pieces together with right sides facing toward you and wrong sides together. Have the top section facing you and working through both thicknesses with contrasting color, work the same as for Rnd 9 of the top section. This joins the two pieces and creates the outline. You will actually have the stitching on the bottom piece extend a couple of rows into the solid dc rows. Before breaking off yarn, crochet a length of chain to use as a loop for hanging and sl st to join. The hanging loop is optional. Sew in ends and the project is complete.
Fragrant Draft Dodgers
This is a simple idea and can be done with a bit of fabric about 5 or 6 inches wide by the length of the dodger you need. Cut a rectangle of that size from pretty cotton fabric. Sew across one end and up the one side. Squish it down as though you were putting on pantyhose to allow as much access as possible to the bottom end. Begin to stuff firmly with balsam pine needles (you can also use polyester fill and toss in some fragrant herbs like mint or scented geraniums or add a little fragrant essential oil to some cotton balls and intersperse them along the way). Leave a little slack towards the center so you can drape this dodger over the door knob when not in use. Finish stuffing and either machine or hand sew the top end.
Tip: At Christmas time purchase a balsam fir and after the holidays remove the needles and put them aside. You will have enough needles to stuff a number of draft dodgers.
© 1998 by Ernestina Parziale
